Baking Shadows with Blender and Wire-frame export
Jump to navigation
Jump to search
Tutorial
- Original Link
- There are a few people here who have requested that I do a quick tutorial on how to bake shadows using the ambient occlusion method and how to export wire-frames with Blender.
- This tutorial will assume that you have some working knowledge of Blender. This is not a hard program to use so spend a few hours playing with it yourself.
- I learned to bake shadows with no prior knowledge of Blender in about 2-3 hours with trial and error while reading various internet guides from Google.
- The steps may vary depending on the version of Blender. I'm using v2.73 because its free and a relatively small download (about 60mb).
- Get it here: https://www.blender.org/
- If anyone has another easier/better method using Blender or suggestions for better results feel free to post your comments.
Steps:

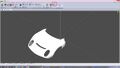
- 1a: Load up your .gmt file with 3dSimEd or another program that is capable of converting meshes to .3ds format.
- 1b: Export your mesh as .3ds format.

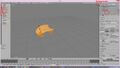
- 2: Load up Blender and import the .3ds file.

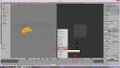
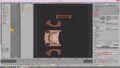
- 3a: Enter the object edit mode.
- 3b: Go to the shading properties.
- 3c: Set faces, edges and vertices to "Smooth"
- 3d: Open up a second screen by dragging the handle to have a split screen format.

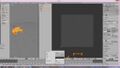
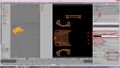
- 4a: Switch the second screen to UV/Image editor. You may need to map the model if it hasn't been done already.
- 4b: Open up a new image and.....

- 5: Set image to the correct size you require. I usually use 2048x2048 or 4096x4096. Make sure this image is selected before you go further.

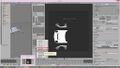
- 6a: With the mesh still in edit mode, select the world properties
- 6b: Here's the properties I use. Feel free to play around or tell me if better settings can be used. Check off "Paper Sky", "Blend Sky", and "Real Sky"
- 6c: "Horizontal Color" I set to black. Both "Zenith Color" and "Ambient Color" I have as white.
- 6d: Turn on "Ambient Occlusion". I usually have factor set at 1.25 in "add" mode.
- 6e: Turn on "Environmental Lighting" and select "Sky Texture". I usually have energy at 1.50.
- 6f: Gather properties I find that "Approximate" with 5 passes is usually good. Personally I don't like the Raytrace outcomes.

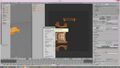
- 7a: Go to render properties
- 7b: In the bake section select "Ambient Occlusion"
- 7c: Check off "Clear" and set Margin to 0 or 1px.
- 7d: Hit the "Bake" button and watch the magic happen.

- 8: If results are satisfactory then save the results as an image. If not change the settings in Step 6 and repeat until you get satisfactory results. I usually export as a png image so I have a transparent background.

- 9: To export the wire-frame:
- UV --> Export UV Layout.
-
 1_zpsevjt2t2s.jpg
 -
 2_zps6jca68zr.jpg
 -
 3_zpsqn4kb2l6.jpg
 -
 4_zpswonn507n.jpg
 -
 5_zpsk7tl6vut.jpg
 -
 6_zps2vcqbnak.jpg
 -
 7_zpscvrujivx.jpg
 -
 8_zpsdwlygnmj.jpg
 -
 9_zpsoc3ajwtr.jpg
Original Post
There are a few people here who have requested that I do a quick tutorial on how to bake shadows using the ambient occlusion method and how to export wire-frames with Blender.
This tutorial will assume that you have some working knowledge of Blender. This is not a hard program to use so spend a few hours playing with it yourself.
I learned to bake shadows with no prior knowledge of Blender in about 2-3 hours with trial and error while reading various internet guides from Google.
The steps may vary depending on the version of Blender. I'm using v2.73 because its free and a relatively small download (about 60mb).

Get it here: https://www.blender.org/

If anyone has another easier/better method using Blender or suggestions for better results feel free to post your comments.

Steps:

[color=#0000ee][u][url=https://s1324.photobucket.com/user/Cappachihngo/media/Blender%20-%20Shadow%20baking%20tutorial/1_zpsevjt2t2s.jpg.html][img]https://2img.net/h/i1324.photobucket.com/albums/u602/Cappachihngo/Blender%20-%20Shadow%20baking%20tutorial/1_zpsevjt2t2s.jpg[/img][/url][/u][/color]
1a: Load up your .gmt file with 3dSimEd or another program that is capable of converting meshes to .3ds format.
1b: Export your mesh as .3ds format.

[url=https://s1324.photobucket.com/user/Cappachihngo/media/Blender%20-%20Shadow%20baking%20tutorial/2_zps6jca68zr.jpg.html][img]https://2img.net/h/i1324.photobucket.com/albums/u602/Cappachihngo/Blender%20-%20Shadow%20baking%20tutorial/2_zps6jca68zr.jpg[/img][/url]
2: Load up Blender and import the .3ds file.

[url=https://2img.net/i/fa/pbucket.gif][img]https://2img.net/i/fa/pbucket.gif[/img][/url][color=#0000ee][u][url=https://s1324.photobucket.com/user/Cappachihngo/media/Blender%20-%20Shadow%20baking%20tutorial/3_zpsqn4kb2l6.jpg.html][img]https://2img.net/h/i1324.photobucket.com/albums/u602/Cappachihngo/Blender%20-%20Shadow%20baking%20tutorial/3_zpsqn4kb2l6.jpg[/img][/url][/u][/color]
3a: Enter the object edit mode.
3b: Go to the shading properties.
3c: Set faces, edges and vertices to "Smooth"
3d: Open up a second screen by dragging the handle to have a split screen format.

[url=https://s1324.photobucket.com/user/Cappachihngo/media/Blender%20-%20Shadow%20baking%20tutorial/4_zpswonn507n.jpg.html][img]https://2img.net/h/i1324.photobucket.com/albums/u602/Cappachihngo/Blender%20-%20Shadow%20baking%20tutorial/4_zpswonn507n.jpg[/img][/url]
4a: Switch the second screen to UV/Image editor. You may need to map the model if it hasn't been done already.
4b: Open up a new image and.....

[url=https://2img.net/i/fa/pbucket.gif][img]https://2img.net/i/fa/pbucket.gif[/img][/url][color=#0000ee][u][url=https://s1324.photobucket.com/user/Cappachihngo/media/Blender%20-%20Shadow%20baking%20tutorial/5_zpsk7tl6vut.jpg.html][img]https://2img.net/h/i1324.photobucket.com/albums/u602/Cappachihngo/Blender%20-%20Shadow%20baking%20tutorial/5_zpsk7tl6vut.jpg[/img][/url][/u][/color]
5: Set image to the correct size you require. I usually use 2048x2048 or 4096x4096. Make sure this image is selected before you go further.

[url=https://2img.net/i/fa/pbucket.gif][img]https://2img.net/i/fa/pbucket.gif[/img][/url][color=#0000ee][u][url=https://s1324.photobucket.com/user/Cappachihngo/media/Blender%20-%20Shadow%20baking%20tutorial/6_zps2vcqbnak.jpg.html][img]https://2img.net/h/i1324.photobucket.com/albums/u602/Cappachihngo/Blender%20-%20Shadow%20baking%20tutorial/6_zps2vcqbnak.jpg[/img][/url][/u][/color]
6a: With the mesh still in edit mode, select the world properties
6b: Here's the properties I use. Feel free to play around or tell me if better settings can be used. Check off "Paper Sky", "Blend Sky", and "Real Sky"
6c: "Horizontal Color" I set to black. Both "Zenith Color" and "Ambient Color" I have as white.
6d: Turn on "Ambient Occlusion". I usually have factor set at 1.25 in "add" mode.
6e: Turn on "Environmental Lighting" and select "Sky Texture". I usually have energy at 1.50.
6f: Gather properties I find that "Approximate" with 5 passes is usually good. Personally I don't like the Raytrace outcomes.

[url=https://2img.net/i/fa/pbucket.gif][img]https://2img.net/i/fa/pbucket.gif[/img][/url][color=#0000ee][u][url=https://s1324.photobucket.com/user/Cappachihngo/media/Blender%20-%20Shadow%20baking%20tutorial/7_zpscvrujivx.jpg.html][img]https://2img.net/h/i1324.photobucket.com/albums/u602/Cappachihngo/Blender%20-%20Shadow%20baking%20tutorial/7_zpscvrujivx.jpg[/img][/url][/u][/color]
7a: Go to render properties
7b: In the bake section select "Ambient Occlusion"
7c: Check off "Clear" and set Margin to 0 or 1px.
7d: Hit the "Bake" button and watch the magic happen.

[url=https://2img.net/i/fa/pbucket.gif][img]https://2img.net/i/fa/pbucket.gif[/img][/url][color=#0000ee][u][url=https://s1324.photobucket.com/user/Cappachihngo/media/Blender%20-%20Shadow%20baking%20tutorial/8_zpsdwlygnmj.jpg.html][img]https://2img.net/h/i1324.photobucket.com/albums/u602/Cappachihngo/Blender%20-%20Shadow%20baking%20tutorial/8_zpsdwlygnmj.jpg[/img][/url][/u][/color]
8: If results are satisfactory then save the results as an image. If not change the settings in Step 6 and repeat until you get satisfactory results. I usually export as a png image so I have a transparent background.

[url=https://2img.net/i/fa/pbucket.gif][img]https://2img.net/i/fa/pbucket.gif[/img][/url][color=#0000ee][u][url=https://s1324.photobucket.com/user/Cappachihngo/media/Blender%20-%20Shadow%20baking%20tutorial/9_zpsoc3ajwtr.jpg.html][img]https://2img.net/h/i1324.photobucket.com/albums/u602/Cappachihngo/Blender%20-%20Shadow%20baking%20tutorial/9_zpsoc3ajwtr.jpg[/img][/url][/u][/color]
9: To export the wire-frame:
    UV --> Export UV Layout.

10: Now you should have two image files. One with the shadow layer and one with the wire-frame. Load them up in an image editor such as Photoshop and enjoy

Hopefully this helps a few people out.

Cheers,
Everfresh Cranberry