3DSimEd
What is 3DSimEd?
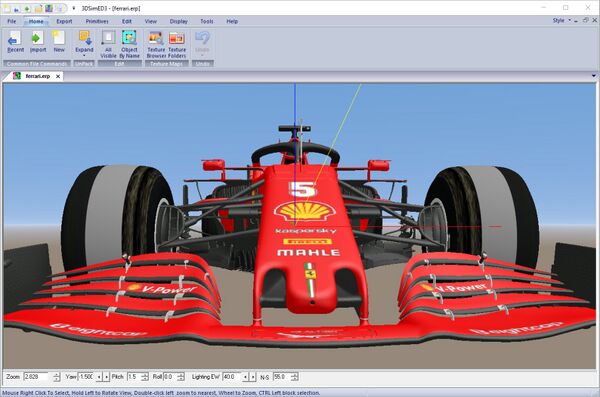
3DSimED is a Windows DirectX application allowing the creation and visualization of models from many racing sim formats.
Models can be exported to Assetto Corsa, Automobilista, rFactor 2 (and 1), GTR2, Race 07, GTL, N2003 and many other games.
Sim formats which can be imported include Grid Legends cars, Grid2019 cars, Forza Horizon 4 cars, F1-2021, F1-2020, F1-2019, F1 2018, F1 2017, Forza 7, Forza Apex, Forza Horizon 3, F1-2016, rFactor2, Assetto Corsa, Grid AutoSport,F1-2010 to F1-2020, NFS Shift, DIRT, GRID, Race 07, GTR Evolution, STCC The Game, GTR2, rFactor, GTL, GTR, Papyrus Nascar 2003 & Grand Prix Legends (GPL), Formula 1 2002 (F1 2002).
3DSimED can also read & write OBJ, FBX, Collada DAE, 3DSMax .3DS, SketchUp .SKP, allowing data to be exchanged with many 3D editors and also applications such as KsEditor the Assetto Corsa editor.
- Description from http://sim-garage.co.uk/
Resources
- 3DSimEd
- Homepage
- In-app Help ("Printed" to PDF files and Converted to HTML)
- 01 3DSimEd 3.2c - 3DSimEd3 Introduction (PDF) - New Features, UI Guide, Ribbon Interface, Context Editing, Edit Face Pane, Vertex Edit Pane, Material Edit Pane, Object Instance Edit Pane, Working With Different Sims
- 02 3DSimEd 3.2c - Function Reference (PDF) - File Menu, Home Menu, Export Menu, Primitives Menu, Edit Menu, View Menu, Display Menu, Tools Menu, Help Menu
- 03 3DSimEd 3.2c - User DirectX Shaders (PDF) - How To Create User DirectX Shaders
- Editing Guides:
- Help and How To
AI Chatbots as 3DSimEd Teachers
- I have created a zip file with 3DSimEd documentation, guides, and tutorials with the intention of uploading to AI like ChatGPT in the hopes of teaching the AI about 3DSimEd so that I can ask questions about how to do things
- 3DSimEd Help Text.zip
- Upload this ZIP to ChatGPT and begin your question with the phrase "Based on this file..." In this way, I was able to get ChatGPT to teach me how to do things in 3DSimEd.
- ChatGPT already has information from the internet about 3DSimEd but it seems that uploading a concentrated form of the knowledge, the zip file, allows it to be much more specific and avoid confusing 3DSimEd with similar apps with similar functions and workflows
Example Conversation
Notes
- I hope this page helps but I'm writing it from a GTR2-centric perspective. Still, for 3DSimEd, it should still largely apply for other supported sims.
Guides
- 3DSimEd Primer: Basic Concepts and Operations - AI generated primer
- How to properly place mirror UV map & change mirror resolution for car by Svictor
Tutorials
Video Tutorials
GTR2 Tutorials:
- 3DSimEd Tiny Tour - Shovas
- Using 3DSimEd to unpack a GTR archive - Shovas
- Using 3DSimEd to Fix Left-Right Reversed Mirrors - Shovas
- GTR2 - Adding a 'no rear wing' option
Miscellaneous 3DSimEd Tutorials:
- How to convert swatchbin textures in 3dsimed 3 1i Tutorial
- 3DSimEd replace a Tire for Example - This Video shows, how you can replace Parts like Tires, Rims, Brakediscs with Parts from another Car, in 3DSimEd.
- 3DSimED - Tool #1 for Racing Game Mods
- 3dsimed tutorial
- 3DSimEd Mini Tutorial. How to remove an object from a scenery directly.
- 3dsimed workshop
- 3dSimed to 3dsMax conversion with mapping
- Tutorial 02 - 3DSimEd import e export
- NR2003 sandbox: 3dSimEd PTF Import Option Settings
- How to save the pivot point on 3Dsimed by KaRiNFuToGT
- How to IMPORT cars from ASSETTO CORSA with TEXTURES
- Helmet 3D with Photoshop & 3DsimED (speed painting) - Helmet for Bonve
- Assetto Corsa | HOW TO ADD REFRACTING HEADLIGTHS
- Converting Cars from Forza to rFactor (1/6) (Playlist)
- rFactor 3dSimEd GMT TEXTUREN EINBIDEN.wmv
- rFactor 1 to rFactor 2 Car Conversion Tutorial Part 1
- rFactor 2 Tutorial: Animated Arms (Conversion Tutorial Part 2)
- Assetto Corsa - Export 3D Models and convert textures with 3DSimED
- Forza to Shift Street Mod for rFactor Tutorial (1/6) (Playlist)
- rFactor Tutorial #5 - How to make a Paintjob for rFactor
- rFactor 3dSimEd GMT Speichern SAVE.wmv
- rFactor 3dSimEd GMT Import.wmv
3DSimEd Basic Concepts
- Scenes
- .SCE files - 3DSimEd compatible files which facilitates loading in all other assets. Not compatible with other software but many assets can be exported in compatible formats.
- Sim specific formats eg. VEH for rFactor, CAR for GTR2
- Some changes cannot be saved/exported for Scenes and, instead, the changes must be done to the Model which may need to be Expanded/Unpacked from the relevant archive eg. GTR2 .GTR archives
- Models
- .3DS files - 3DSimEd compatible files representing 3D models. Not compatible with other software but can be exported in compatible formats
- Sim specific formats eg. GMT for isiMotor games, PTF for Papyrus games
- Objects
- Expand Archive eg. .GTR files ie. Expand an archive of assets to individual files
- Export Objects eg. .GMT files ie. Expand objects to individual files and optionally add/pack to .GTR file
- Materials
- Texture Maps ie. Textures assigned to a Material
- UV Mapping
- Textures
- ...todo...
3DSimEd Basic Operations
Expand GTR Archive Files
Extract the contents of a .GTR archive.
- Tools > Expand > GTR
- Browse to GTR file location: Open
- You may want to copy&past the GTR file name for creating the folder to extract to in the following steps
- Browse to extraction location > Create new folder as needed: Okay
- Confirm Write: Yes
- Confirm Overwite: Yes or No as needed
You can now browse in Explorer to the extraction folder and view the individual files.
Pack GTR Archive Files
Pack files to a .GTR archive.
- Tools > Pack Data > GTR2 .GTR
- Browse to folder with files to pack > Select files to pack: Open
- Browse to folder to place packed file > Enter Filename: Save
You can now browse in Explorer to the packed file folder and open the file in, for example, Geditor for .GTR files.
Export Object to use in 3D Modeling Software like Blender
- File > Import As Objects > Browse to Model GMT > Open
- If needed: Tools > Split Objects By Material > Yes
- Right-click object > Select "Object ..." context menu option > Isolate Object (right-hand sidebar icon)
- Export > Plugin Export
- Save as Type: Collada .DAE (*.dae) or Wavefront Obj (.obj)
- Save
You can now open the object saved in the DAE or OBJ file in a full featured 3D modeling app like Blender.
To bring the object back into 3DSimEd, you need to export from ex. Blender to the same format, DAE or OBJ, then in 3DSimEd you can import that file and re-integrate the object with the model you were working on.
How Tos
Basic Operation
- Importing a Model:
- Import > Navigate to .CAR file > Open
- Viewing a Model:
- Rotate Model: Click and drag
- Zoom: Mouse Wheel
Import a Car to 3DSimEd
- Import (top toolbar)
- Navigate to your folder with the .CAR file in it
- Ex. GTR2: 14068_G2_BMW_M3GTR.car in GameData\Teams\24H\BMW M3GTR Teams\0815 Motorsport\
- Change the filter drop-down to *.car' if needed
- Mine defaulted to *.trk and wouldn't show my .car files
- Click Open: The car should display
Select Objects On Car
- Object By Name
- Click on an object: This moves to and highlights the object
- Click OK: Dismisses the object selection dialog and opens an object properties dialog on the right-hand side
Editing Object Properties
- Select an Object: Opens "Object Instance Edit" dialog on right-hand side
Fixing Distorted Mirrors
Shovas's Steps:
- File > Import > Select your Model GMT that contains the mirrors you want to fix > Open
- You may need to Expand/Unpack the GMT from the GTR archive it is in
- Right-click mirror Face > Material <MATERIAL_NAME> > Edit Channel Texture Coordinates (sidebar icon) > Scale UV > Scall/Offset UV Channel 0: Make your Scale or Offset adjustments
- Adjustments affect all mirrors of the Material. If you need independent adjustments, see #Independent Mirror Adjustments
- You probably do need independent mirror adjustment as adjusting 3 mirrors at once with one set of scaling values is almost impossible to get right
- Scale is a number less than 1, which enlarges the texture, or greater than 1, which shrinks the texture
- Offset is a number less than 0, which moves the texture to the left, or greater than 0, which moves the texture to the right
- Remember that UV Texture Mapping wraps the texture and also repeats the texture as needed to fully wrap
- Adjustments affect all mirrors of the Material. If you need independent adjustments, see #Independent Mirror Adjustments
- Click Close checkmark sidebar icon to confirm your changes
- Export > Model Data to where your GMT is
- Use Export > Save Model Data, Add to .GTR if storing GMTs in GTR archives and remember to remove the loose GMTs if you're not using them as they may cause unexpected results in GTR2
Resources:
- Help with 3DSimEd to edit a mod car's mirror and export again - Helpful post with steps and other helpful info in the thread
- Using 3DSimEd to Fix Left-Right Reversed Mirrors [Video] - Shovas
- Inverted mirrors, how to switch them right? - Another helpful thread
Courtesy of IMC'67:
- Right click on the car object that includes the mirror material and then choose "Object..." followed by the name of the actual object.
- Then choose "Isolate object" (4th button in the second row) from the "Object Instance Edit" panel on the right of your screen which will open the object in a new window.
- Click the "Edit" tab in 3DSimEd's main menu at the top of your screen followed by "Editing Materials".
- Click the MIRROR entry in the Material List and then the "Rescale Tex" button.
- Here you use the "Scale U" and "Scale V" values to change the aspect ratio of the mirror image. U = horisontal and V = vertical.
- When you're satisfied with the aspect ratio, use the "Offset" values to position the image within the mirror.
- Click the "OK" button.
- Click the "Export" tab on the main menu followed by "GTR2" and "Save Model Data".
- Save the object .gmt file to the car's main folder.
- You can later pack all your edited object files into the relevant .gtr files but it's not necessary and much more convenient to have the object files loose in the folder for future edits.
Independent Mirror Adjustments
ie. Left/Right Mirror Images Reversed
Video: Using 3DSimEd to Fix Left-Right Reversed Mirrors - Shovas
Mirror shows reflection for the wrong side of the car ie. left mirror shows right mirror's image and vice versa:
- Import as usual
- File > New to get a new temporary tab to work in
- On the original tab, CTRL-Drag to select a mirror > Cut
- Paste Face into temporary tab
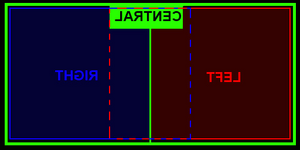
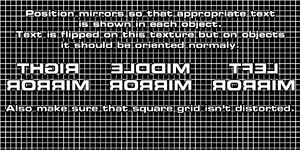
- Make UV Scale and Offset Adjustments so that it displays the correct side (use a test texture map that shows you left-center-right).
- Click Close checkmark sidebar icon to confirm your changes
- On the temporary tab, CTRL-Drag to select mirror > Cut
- Paste Face into original tab (position will be respected) and repeat as necessary for other mirrors
- Click Close checkmark sidebar icon to confirm your changes
Gotchas:
- When editing Materials, always remember to click the Close checkmark sidebar icon otherwise it seems easy to lose your changes
- When pasting Materials, always remember to click the Close checkmark sidebar icon otherwise it seems easy to lose your changes
- Do not leave expanded/unpacked GTR archive contents files around if you're using GTR archives. GTR2 may load GMT files over GMTs inside GTR archives, which may not be what you expect.
- Alternatively, leave the expanded/unpacked files loose where they are, ZIP up the GTR archive file, and delete the original GTR archive file. GTR2 will load the files individually instead of through the GTR archive, as long as they are in the same folder as the original GTR file - or you could update the CAS file MASFile=<PATH> parameters to point to a new folder and put the GTR archive files in there.
- Revert Texture Map setting in 3DSimEd to production value instead of testing value eg. testing texture for mirrors
- Watch GTR2 trace.txt in case GTR2 is crashing out at any point, not loading the car spinner in the car selection screens or crashing while loading into track eg. this helped me realize I hadn't put back in the correct mirror texture map
Fix Left-Right Reversed Mirrors
- Using 3DSimEd to Fix Left-Right Reversed Mirrors [Video] - Shovas
Testing Mirror Textures:
- Reverse text in images is correct. When applied as a texture, it will be displayed the right way around. This is how you know the mirrors are correct in 3DSimEd.
Step by step 3DSimEd instructions:
1. Expand Archive GTR Files to work with
1.1 Expand Archive GTR containing Model GMT with mirrors
1.2 Tools > Expand > GTR2
1.3 Create temporary folder to house expanded files
1.4 Select GTR Archive: Open
1.5 Select Folder To Extract To: OK
1.6 Write Files From ... to ...: Yes
1.7 Over files if they exist in the destination folder: Yes
2. Import Model
2.1 File > Import As Objects > Select correct GMT: Open
2.2 Double-click rearview mirror to center view
2.3 Right-click mirror to demonstrate everything is one object
2.4 Tools > Splits Objects By Material
3. Fix Model
3.1 Right-click Mirror > Object xxx > Isolate Object (sidebar icon): New tab is created ("Mirrors Tab")
3.2 (Mirrors Tab) Double-click rearview mirror to center view
3.3 Rotate into correct perspective
3.4 Right-click mirror > Material Mirror > Texture Map ... > Browse to mirror folder > Select texture: OK
3.5 Close (sidebar icon): Click (or you might lose your changes)
3.6 CTRL + Left-click drag left mirror > Cut
3.7 File > New: New tab is created ("WIP Tab")
3.8 (WIP Tab) Edit > Paste > Paste Faces
3.9 Zoom in on mirror, double-click to center view, and rotate into persepctive
3.10 Right-click mirror > Material Mirror > Texture Map ... > Browse to mirror folder > Select texture: OK
3.11 Edit Channel Texture Coordinates (sidebar icon) > Scale UV > Scale/Offset UV Channel 0
3.12 Offset U (horizontal) > 0.5: OK
3.13 Close (sidebar icon): Click (or you might lose your changes)
3.14 CTRL + Left-click drag mirror > Cut
3.15 (Mirrors Tab) Edit > Paste > Paste Faces
3.16 Repeat cut-fix-paste for right mirror
4. Update Original Model
4.1 (Original Tab) CTRL + Left-click drag mirrors > Erase
4.2 (Mirrors Tab) CTRL + Left-click drag mirrors > Copy
4.3 (Original Tab) Edit > Paste > Paste Faces
4.4 Right-click mirror > Material MIRROR > Texture Map ... > Browse to mirror folder > Select texture: OK
5. Export Model and Update Original Archive GTR
5.1 Export > GTR2 > Save Objects, Save To GTR > Browse to Expanded GTR Folder: OK
5.1.1 This saves the GMT as a loose file which you can reopen without having to expand the Archive GTR again.
5.2 Browse to original GTR folder > Select GTR to add GMT to: Save
5.2.1 This repacks the Archive GTR to update the Model GMT inside with your latest version
6. Clean up
6.1 Do not leave loose Model GMTs around that also exist in Archive GTRs. It may cause confusion as to which Model GTR2 is loading. Easiest thing to do is to zip up and then remove the folder you created with the expanded files (usually .DDS, .GMT, etc.).

DONE!
Separate Window Materials From Cockpit or Other Objects
- Original Post
- Sometimes the windshield/other windows are not separate objects and are not exposed in the CAS file which makes it impossible to disable shadows on them. In these cases, you need to separate the object and expose it in the CAS file.
Freeracer78's steps:
1) Drag a .car file into Simed, find out which .gmt file the glass mesh is in,
2) open this object (this gmt file) in a new window (right click in the object, open)
3) select only the glass material (display>materials), cut all the polygons of the car windows material (left Button click and drag), click in cut to save the mesh in ram memory,
4) open a new document, and paste the mesh it into the document, and save the glass.gmt file in the car folder, close the document
5) back to previous document, and also save it/export gmt (the file with removed glasses) in the same folder.
6) Open the .cas and add the lines to the new glass.gmt file.
7) wait 30 minutes while GTR2 loading, make a coffe, smoke a cigar or two
8) test your work in game
9) If its ok, pack the edited gmt files into .GTR files with geditor
Done
Notes:
- In my case, rather than loading a .CAR file (which wasn't working anyway), I had to expand a GTR archive file to get at a Model GMT and import that into 3DSimEd. After, I had to re-pack the original Model GMT and the new window Model GMT into the original GTR archive.
- In the CAS file, I just copy&pasted an existing MeshFile line and replaced the .GMT filename with the one 3DSimEd saved the new Model GMT as (although it can be anything unique), and I set ShadowReceiver=False
Shovas' slightly different steps:
Scratch: Interestingly, there's a slightly different way to do this:

Edit: I think the drawback with this is that you can't just save the original GMT after deleting the object that you isolated as a new GMT. 3DSimEd forces you to Save Objects, which saves all objects in the GMT as many individual files. Solution: Reopen as normal Import (not Import As Objects), delete materials, and Save Model.

# Import As Objects
# Split Objects By Material
# Isolate object
# Isolated Model: Export > GTR2 > Save Model Data
#* Notice automatically generated name: hondansxgt3evo_cockpit_style4_hondansxgt3evo_intwd11
# Original Model: Re-open as normal Import (not Import as Objects)
# Delete materials
# Export > GTR2 > Save Models
# Add GMTs back to GTR
Looseether's comments on multiple ways to do the same thing:
There are many ways to do things in 3DSimEd. ;)

If you want to just save the original GMT from how you are editing as above, only have that object displayed (hide all the other objects), then when you go to save objects, 3DSimEd will ask you if you also wish to include the hidden objects in the save.
Say no and you have now saved out that single GMT.

There is a lot to be said above techniques in 3DSimEd that's for sure and you'll find we all use a variety of methods.
Looseether's comments on working with GTRs packed or unpacked:
Personally, I generally only ever load as objects when I wish to explode the loaded objects into a single mesh.
Most other times it is loading in a full car by importing the .car file for me.
Yes there are times I just load in a single object but to kick it all off I load in a .car file to get access to all the resources used by a car.
You can then save out all the .gmts and textures to a folder to have an expanded, workable version of a car that you can then load in what you need for the job at hand.
Just save any edited objects and/or textures you alter to the mods root until happy that its all working then pack your edited bits back to their respective .GTR packages.
Looseether's comments on using Geditor over 3DSimEd for working with GTR Archives:
I suggest you get used to using Geditor as you can pull out what you want from GTR files without the overkill and hassle of using 3DSimEd to do it. It's quirks are not that many and are always the same.
To make Geditor easier to get along with, you can add a small texture file to GTR packages, named in such a way that it appears at the top of the file list when you open it in Geditor.
1_dummy.dds is not uncommon and if you happen to see such a file it is inserted so that Geditor doesn't chuck a wobbly when the first file it finds is a .gmt WHICH IT CANNOT DISPLAY and is the reason for almost all it's idiosyncrasies.
Tips and Tricks
Always Keep the Ribbon Open
- Right-click on Ribbon bar and uncheck Minimize The Ribbon
Mass Apply Object Properties
https://trackaholics.forumotion.com/t9506-edit-settings-for-multiple-objects-in-simed#174976
Scorpyo:

We can load multiple objects in SimED at once and when you want to set same setting for some material parameters you can go to Edit/Batch Edit and all parameters which you change will be applied to all materials used by those objects which are loaded in SimED.

When we load multiple objects in SimED and want to set (let's say) "Shadow Receiver" to "True" for all those objects we have to open object settings dialog for each object and set that parameter for each object separately. On current track which I'm editing I have 150 objects just for track and I can't believe that there is no option to set all objects which are loaded into SimED at once, but I also can't find a way to do that.

Koyaki:

ctrl+left mouse button and hover over the objects you want to edit, in the box that opens, select "objects", then "edit tags", then you can set all the things you want. If the objects are correctly named you can load them all, then in the "display" menu, "objects filter", you can turn them all off except the cones for example, select them all with ctrl+left button, then set the lodin-lodout to 0-300, then display the trees, select them all and set the lodin-lodout to 0-800. If they are just named obj00x you can display them according to their material name and do the same...
GTR2 Mirror Texture MIRROR.BMP
- Use the literal string "MIRROR.BMP" (without quotes) instead of trying to browse to an actual folder and file of your mirror texture and it will use the game's default mirror.bmp
Use Isolate Object To Focus Your Work
- When editing an object, you can click the Isolate Object button in the sidebar to open a new tab with only your object present
- Your object is likely a collection of Faces and it can be easier to work with them isolated eg. left/rearview/right mirrors
Issues
Missing d3dx9_43.dll
- tl;dr Manually install "DirectX End-User Runtimes (June 2010)", still available direct from Microsoft
- Some DirectX 9 legacy DLLs are no longer included in the most recent DirectX install media so you have to install the old files by hand
- DirectX End-User Runtimes (June 2010) (Download)
Gotchas
You must be editing Models not Scenes to be able to Save Model Data
- 3DSimEd allows you to open a GTR2 car by opening a .CAR file and, while you can make some Model changes (eg. mirror adjustments) you will not have the needed option Save Model Data
- Instead, load the Model GMT, make your changes, and Save Model Data will be available
- You may need to Expand/Unpack the GTR that holds the GMT, first, and pack it back when done
Always Click Close Buttons in Sidebars Or Risk Losing Your Changes
- Sometimes, for example, when editing or pasting Materials, you'll make a change in the sidebar and then continue work on the model but it is easy to lose your work so always click the Close button in the sidebar to confirm your changes bbefore moving on
You must Import As Objects on GMT files to work with Objects
- Import As Objects on GMT files to work with Objects
- I thought File > Import was enough but you have to use File > Import As Objects for the Objects options not to be grayed out
- In this mode, everything may appear as a single object, and you won't be able to select a specific object. In this case, Tools > Split Object By Material will allow you to be able to select the objects. For example, side mirrors might not be selected by themselves distinct from the entire car chassic, until you do this.
Do not leave expanded/unpacked GTR contents around if you're using GTR archives
- Do not leave expanded/unpacked GTR files around if you're using GTR files
- GTR2 may load file system GMTs over GMTs inside GTRs, which may not be what you expect
- I unpack GTRs to a folder of the same or similar name while working on the files and then zip it up and delete the folder when done. I can easily unzip it again to work on the files later.
Revert Texture Map to production value after testing
- Revert Texture Map to production value instead of testing value eg. testing texture for mirrors
- If the Texture Map is not a valid file GTR2 can find then it will crash
- Watch GTR2's trace.txt to see if it says anything that might help
Watch GTR2 Trace.txt for helpful clues to crashes
- Watch GTR2 trace.txt in case GTR2 is crashing out at any point, not loading the car spinner in the car selection screens or crashing while loading into track eg. this helped me realize I hadn't put back in the correct mirror texture map
Save Objects generates extra _output.trk file
When performing Save Objects in 3DSimEd, it generates an extra _output.trk file file, like this:
CUBEASF

View=mainview
{	Clear = False
	Color = (0, 0, 0)
	Size = (1.00, 1.00) Center = (0.5, 0.5)
	FOV = (77.75, 62.50)
	ClipPlanes = (0.50, 1500.00)
	View = rearview
	{
		Clear = False
		Color = (0, 0, 0)
		Size = (0.200, 0.100) Center = (0.50, 0.01)
		FOV = (62.5, 62.5)
		ClipPlanes = (0.50, 150.00)
	}
}
Instance=group001
{
	VisGroups=(32)
	MeshFile=group001.gmt CollTarget=False HATTarget=False
}
Looseether's comments:
I'm not sure what purpose it serves but you can delete it without any issues.
I assume it's a *stub* for if you wanted to add the object to a track.
Object Properties Glossary
TODO
Materials
TODO
Textures
Scaling and Repositioning Textures
- Scale U: Shrink: >1.0 (texture repeats more), Enlarge: <1.0 (texture repeats less)
- Scale V: Shrink: >1.0 (texture repeats more), Enlarge: <1.0 (texture repeats less)
- Offset U: Positive move left, negative move right
- Offset V: Positive move up, negative move down
Notes:
- 3DSimEd vs Blender vs Unreal Engine vs ...
- 3DSimEd and Blender serve similar purposes and share many functionalities
- So finding videos for Blender for related functions can be very helpful
- UV Mapping and UV Scaling
Gotchas:
- Changing Scale U affects the texture position because textures 0,0 is pinned to top-left or bottom-left (??)
- Understanding UV Mapping/Scaling probably makes sense of this (see notes above)
Shaders
TODO
3DSimEd and GTR2
Animated Wipers Powered by the Crew Chief GTR2 Enhancements Plugin
Work in Progress
- Crew Chief GTR2 Enhancements Plugin Homepage - Find manual link here
- Details in the manual under the "Wiper Animation" section
- Wiper Patches for Crew Chief GTR2 Enhancements plugin - Thread with helpful details
- TIW Steps from a Discord conversation (direct message link):
- "the very first step is to extract rainscreen and make rainscreen to work (without button), and look good, once you have rainscreen working, you can easily build all 4 materials needed"
- "I normally open it separately, I extract .gtr contents and normally rainscreen is separate GMT. Now, have a look at RAIN_ANIM material."
- "then open BMW_M8_GTE_1W.GMT see how its properties look like, do not rename material for now."
- "during development, I put new material in Teams folder. so see it uses rain_anim* textures. 10 frames. change texture to the one used in M8 material and use Ctrl+G to save it to teams. Then, start game in Rain. that's where -cclsr switch is very handy."
- 10 frames for
- "put wiper textures to Teams folder. and during development, new GMTs go to Teams as well, Yeah one of the biggest things to learn is GTR2 looks for things in many locations. .gmt in Teams will override .gmt in .gtr file"
- "Next step is to adjust texture mapping:"
- "Scale values below 1 make mapping larger, above 1 smaller (squeeze texture). Offsets are self descriptive but direction depend on the mesh, so you'd need to try."
- "This is gonna be tedious, and worst part is that mapping will look different in game (and that's why I came up with cclsr and ctrl+c)"
- "Normally, once you get experienced with it, it is 5 mins per car, but sometimes there are complications like banners or issues with side windows."
GTR233_WIPER_hD0W00.dds

h - horizontal, v - vertical
D - dual, S  - single, M - middle (taped)
0 - stopped wiper,  1 - running wiper
W - wet condition  - D - dry condition

-The Iron Wolf

